Connector Marketplace
The Connector Marketplace is where you browse and enable the external tools and data sources Opulent can use during a session. Most connectors run over the Model Context Protocol (MCP), an open standard that lets Opulent call hundreds of external tools. Opulent supports 3 MCP transport methods (stdio, SSE, and HTTP), plus a set of native connectors that ship with the platform.
The Connector Marketplace is a Partial capability today. A working catalog of MCP servers and native connectors is available, and admins can add custom MCP servers. Some marketplace listings and one-click enablement flows are still being filled in, so if a connector you need is missing, add it as a custom MCP server or request it. This page describes what you can do now and marks where behavior is still expanding.
Why use connectors?
With connectors, Opulent can help you across many lanes of work:
- dig through Sentry, Datadog and Vercel logs
- act as a Data Analyst in Slack by connecting database MCPs
- dig into SonarQube, CircleCI, and Jam issues
- bulk create Linear tickets, Notion docs, Google Docs (through Zapier) and more
- pull diligence, CRM, and finance context from Airtable, Stripe, and Hubspot
- a lot more!
Engineering work is one lane among many. The same connectors let Opulent run research, GTM, finance, and operations tasks against the systems your team already uses.
Get started with connectors
Navigate to Settings > Connections > MCP servers to browse and enable connectors.
Configuration tips
For connectors that authenticate with OAuth, Opulent will prompt you to visit a URL to connect your account. We strongly recommend using a service account, not your personal account, as access will be shared within your organization.
Don't see the connector you're looking for? Organization admins can add any MCP server using the Add a custom MCP button. If you don't have admin permissions, use Suggest MCP Integration to request one.
Having trouble? Contact us via our support page or via support@opulentia.ai.
Setting up a custom MCP server
If the connector you need isn't in the marketplace, organization admins can add any MCP server using the Add a custom MCP button. Opulent supports three transport types for custom servers:
Adding custom MCP servers requires the Manage MCP Servers permission. If you don't see the Add a custom MCP button, contact your organization admin or use the Suggest MCP Integration option to request a new server.
| Transport | Best for | Required fields |
|---|---|---|
| STDIO | Local CLI-based servers (e.g., npx, uvx, Docker) |
Command, args, env variables |
| SSE | Remote servers using Server-Sent Events | Server URL, headers |
| HTTP | Remote servers using Streamable HTTP | Server URL, headers |
Step-by-step: Adding a custom MCP server
- Navigate to Settings > Connections > MCP servers.
- Click Add a custom MCP at the top of the page.
- Fill in the server details:
- Server Name: A descriptive name for the server (e.g., "Internal API Gateway").
- Icon (optional): An emoji or URL to use as the server's icon.
- Short Description: A brief summary of what the server does.
- Select the transport type (STDIO, SSE, or HTTP).
- Fill in the transport-specific configuration fields (see Configuration format below).
- Click Save to create the server.
- Click Test listing tools to verify the connection. Opulent will spin up an isolated test environment, connect to your server, and attempt to discover its available tools.
The Test listing tools button is disabled until you save your configuration. If validation fails, check the error message displayed — it will indicate whether the issue is with connectivity, authentication, or a timeout.
Configuration format
The examples below show JSON representations of each transport's configuration fields. In practice, you fill these in through the web form. You do not need to write or paste JSON. The JSON format is shown here for clarity and as a reference for API-based or programmatic setups.
STDIO transport
Use STDIO for servers that run as local processes. You provide the command to launch the server, along with any arguments and environment variables.
Fields:
- Command (required): The executable to run (e.g.,
npx,uvx,docker). - Arguments: Command-line arguments passed to the server.
- Environment Variables: Key-value pairs set in the server's process environment. Use these to pass API keys, tokens, or configuration values.
Example — a custom STDIO server using npx:
{
  "transport": "STDIO",
  "command": "npx",
  "args": ["-y", "@example/my-mcp-server"],
  "env_variables": {
    "API_KEY": "your-api-key",
    "API_BASE_URL": "https://internal-api.example.com"
  }
}
Example — a custom STDIO server using Docker:
{
  "transport": "STDIO",
  "command": "docker",
  "args": ["run", "-i", "--rm", "-e", "DB_CONNECTION_STRING", "my-org/my-mcp-server:latest"],
  "env_variables": {
    "DB_CONNECTION_STRING": "postgresql://user:pass@host:5432/mydb"
  }
}
SSE and HTTP transports
Use SSE or HTTP for remote servers accessible over the network. HTTP (Streamable HTTP) is recommended for new integrations; SSE is supported for legacy servers.
Fields:
- Server URL (required): The endpoint URL of the MCP server.
- Authentication method: Choose between
None,Auth Header, orOAuth.- For Auth Header: Provide the header key (defaults to
Authorization) and the header value (e.g.,Bearer your-token). - For OAuth: Opulent will prompt you to complete an OAuth flow during your first session.
- For Auth Header: Provide the header key (defaults to
Example — a remote HTTP server with bearer token auth:
{
  "transport": "HTTP",
  "url": "https://mcp.internal-service.example.com/mcp",
  "auth_method": "auth_header",
  "headers": {
    "Authorization": "Bearer your-api-token"
  }
}
Example — a remote SSE server with no auth:
{
  "transport": "SSE",
  "url": "https://mcp.example.com/sse"
}
When choosing between SSE and HTTP, prefer HTTP (Streamable HTTP). SSE is a legacy protocol and is being deprecated across the MCP ecosystem.
Common patterns
Connecting to an internal API
Expose your internal API as an MCP server so Opulent can query it directly. Use the STDIO transport with a wrapper that translates MCP tool calls into API requests.
{
  "transport": "STDIO",
  "command": "npx",
  "args": ["-y", "@example/api-mcp-bridge"],
  "env_variables": {
    "API_BASE_URL": "https://api.internal.example.com",
    "API_TOKEN": "your-internal-api-token"
  }
}
Alternatively, if your internal API is reachable over the network, use the HTTP transport:
{
  "transport": "HTTP",
  "url": "https://api.internal.example.com/mcp",
  "headers": {
    "Authorization": "Bearer your-internal-api-token"
  }
}
Connecting to a database
Use a database MCP server to give Opulent read or write access to your data. Many community-maintained servers exist for common databases.
{
  "transport": "STDIO",
  "command": "npx",
  "args": ["-y", "@modelcontextprotocol/server-postgres", "postgresql://user:password@host:5432/database"]
}
For production databases, use a read-only connection string or a database user with restricted permissions. Opulent executes queries based on user instructions, so scoping access appropriately is important.
Connecting to a custom tool or script
Wrap any CLI tool or script as an MCP server. For example, a Python-based server using uvx:
{
  "transport": "STDIO",
  "command": "uvx",
  "args": ["my-custom-mcp-server"],
  "env_variables": {
    "CONFIG_PATH": "/path/to/config.json"
  }
}
Or a Docker-based server for isolated execution:
{
  "transport": "STDIO",
  "command": "docker",
  "args": ["run", "-i", "--rm", "my-org/custom-mcp-server:latest"]
}
Using environment variables for secrets
Pass sensitive values through environment variables rather than hardcoding them in arguments. Opulent's Secrets feature can manage these values. Store your API keys or tokens as secrets, then reference them in your MCP server configuration.
Troubleshooting custom MCP servers
"Test listing tools" fails
| Symptom | Likely cause | Fix |
|---|---|---|
| "Verify server URL and network connectivity" | The server URL is unreachable | Check that the URL is correct and accessible from the internet (or from Opulent's network if using VPN) |
| "Check authentication credentials and permissions" | Invalid or missing auth credentials | Verify your API key, token, or OAuth configuration |
| "Server took too long to respond - check server status" | The server didn't respond within the timeout | Ensure the server is running and responsive; check for firewall rules blocking the connection |
| "MCP server validation failed" (generic) | Command not found, missing dependencies, or server crash | For STDIO servers, verify the command exists and runs locally; check that all required env variables are set |
Server connects but tools aren't available
- Verify the server correctly implements the MCP protocol's
tools/listmethod. - For STDIO servers, ensure the process writes valid JSON-RPC messages to stdout and reads from stdin. Logging or debug output to stdout will break the protocol.
- Check that environment variables are set correctly. Missing values (e.g., a blank API key) can cause the server to start but fail to register tools.
OAuth authentication issues
- When prompted to authenticate, complete the OAuth flow in the browser window that opens. Opulent will wait for the callback.
- If authentication fails, check that the OAuth redirect URI is configured correctly on the provider side.
- Only users with the Manage MCP Servers permission can authenticate OAuth-based MCP servers. If you see a permissions error, contact your org admin.
For OAuth-based connectors, use a service account rather than your personal account. Access is shared across your organization, and all members' sessions will use the same authenticated connection.
General debugging tips
- Check the server locally first. Before adding a custom server to Opulent, verify it works by running the command or hitting the URL from your own machine.
- Review Opulent's session logs. If a server fails during a session, Opulent will log the error. Look for MCP-related messages in the session output.
- Simplify and iterate. Start with the minimal configuration (e.g., no auth, default settings) and add complexity once the basic connection works.
- Verify environment variables. A common issue is missing or misnamed env variables. Double-check that every required variable is set in the configuration.
If you're building your own MCP server, the Model Context Protocol specification has detailed documentation on the protocol, transport types, and tool definitions.
Marketplace connectors
Below are configuration details for specific connectors available in the marketplace.
Vercel, Atlassian, Notion, Sentry, Neon, Asana, Jam and many more
Many connectors in our marketplace can be enabled without configuration with 1 click!
Just click "Enable". You'll be prompted to connect a service account during your Opulent session, or when you click "Test listing tools".
Available connectors include:
- AlloyDB
- Asana
- Atlassian
- BigQuery
- Cloud SQL (MySQL)
- Cloud SQL (PostgreSQL)
- Cloud SQL (SQL Server)
- Cloudflare
- Cortex
- Dataplex
- Figma
- Fireflies
- Firestore
- Jam
- Linear
- Looker
- Metabase
- MySQL
- Neon
- Notion
- PostgreSQL
- Prisma
- Sentry
- Spanner
- SQL Server
- Vercel
- More below!
Linear: If you have the Linear integration connected, Opulent already has native Linear tools and you do not need to configure the Linear MCP separately.
Datadog
This is the official Datadog remote MCP server. When you enable it from the marketplace, you'll be prompted to authenticate with your Datadog account via OAuth.
You'll also need to select your Datadog site/region (e.g. US1, US3, US5, EU, AP1, AP2, US1-FED) when enabling the connector.
Slack
This is the official Slack remote MCP server. When you enable it from the marketplace, you'll be prompted to authenticate with your Slack account via OAuth.
Note that it uses user-level OAuth: if connected with organization-wide access, all org members share the same user identity, so we recommend using personal access.
Supabase
You'll need to provide a personal access token, which you can find and create at https://supabase.com/dashboard/account/tokens
Figma
This is the official Figma remote MCP server. When you enable the connector from the marketplace, you'll be prompted to authenticate with your Figma account via OAuth.
When using this connector, make sure to send Opulent a link to your Figma file.
Stripe
You'll need to provide an authorization header which follows the format Bearer <TOKEN>, where <TOKEN> is your Stripe API key. More info at: https://docs.stripe.com/mcp#bearer-token
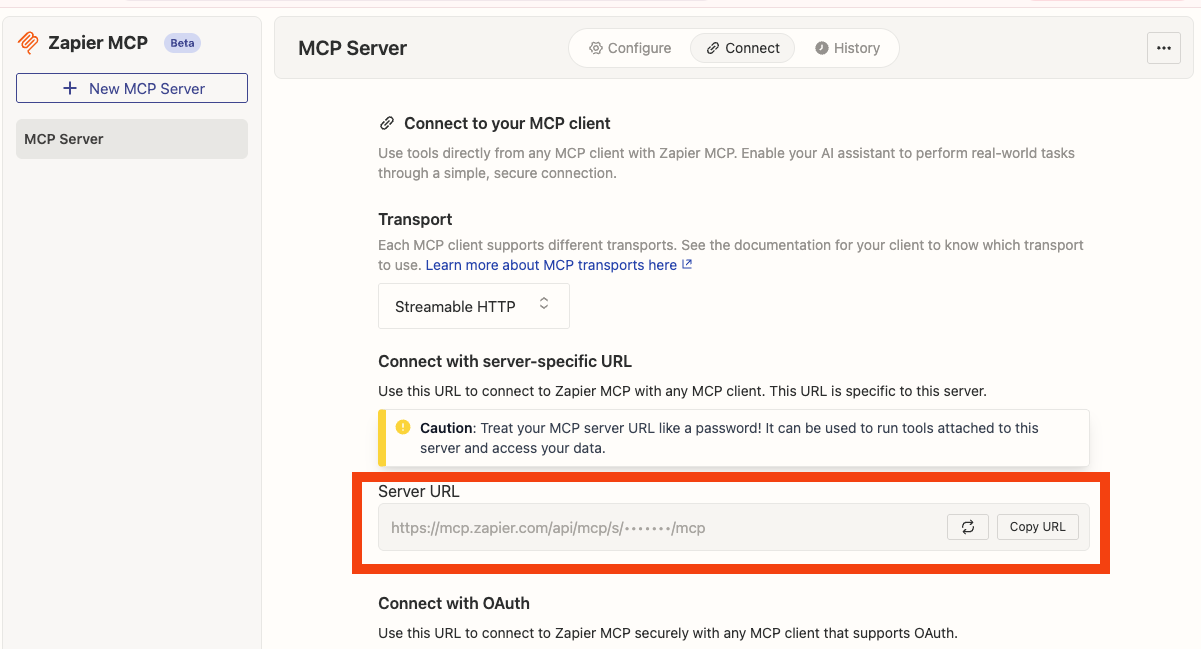
Zapier
You'll need to provide an authorization header which follows the format Bearer <TOKEN>.
You'll need to extract your Bearer token from the Server URL provided at https://mcp.zapier.com/mcp/servers > Connect
Your Server URL will look like: https://mcp.zapier.com/api/mcp/s/*****/mcp
Extract the starred section (*****) and use it in the authorization header you provide: Bearer *****
Airtable
You'll need to provide an Airtable API key. You can find your API keys at: https://airtable.com/create/tokens
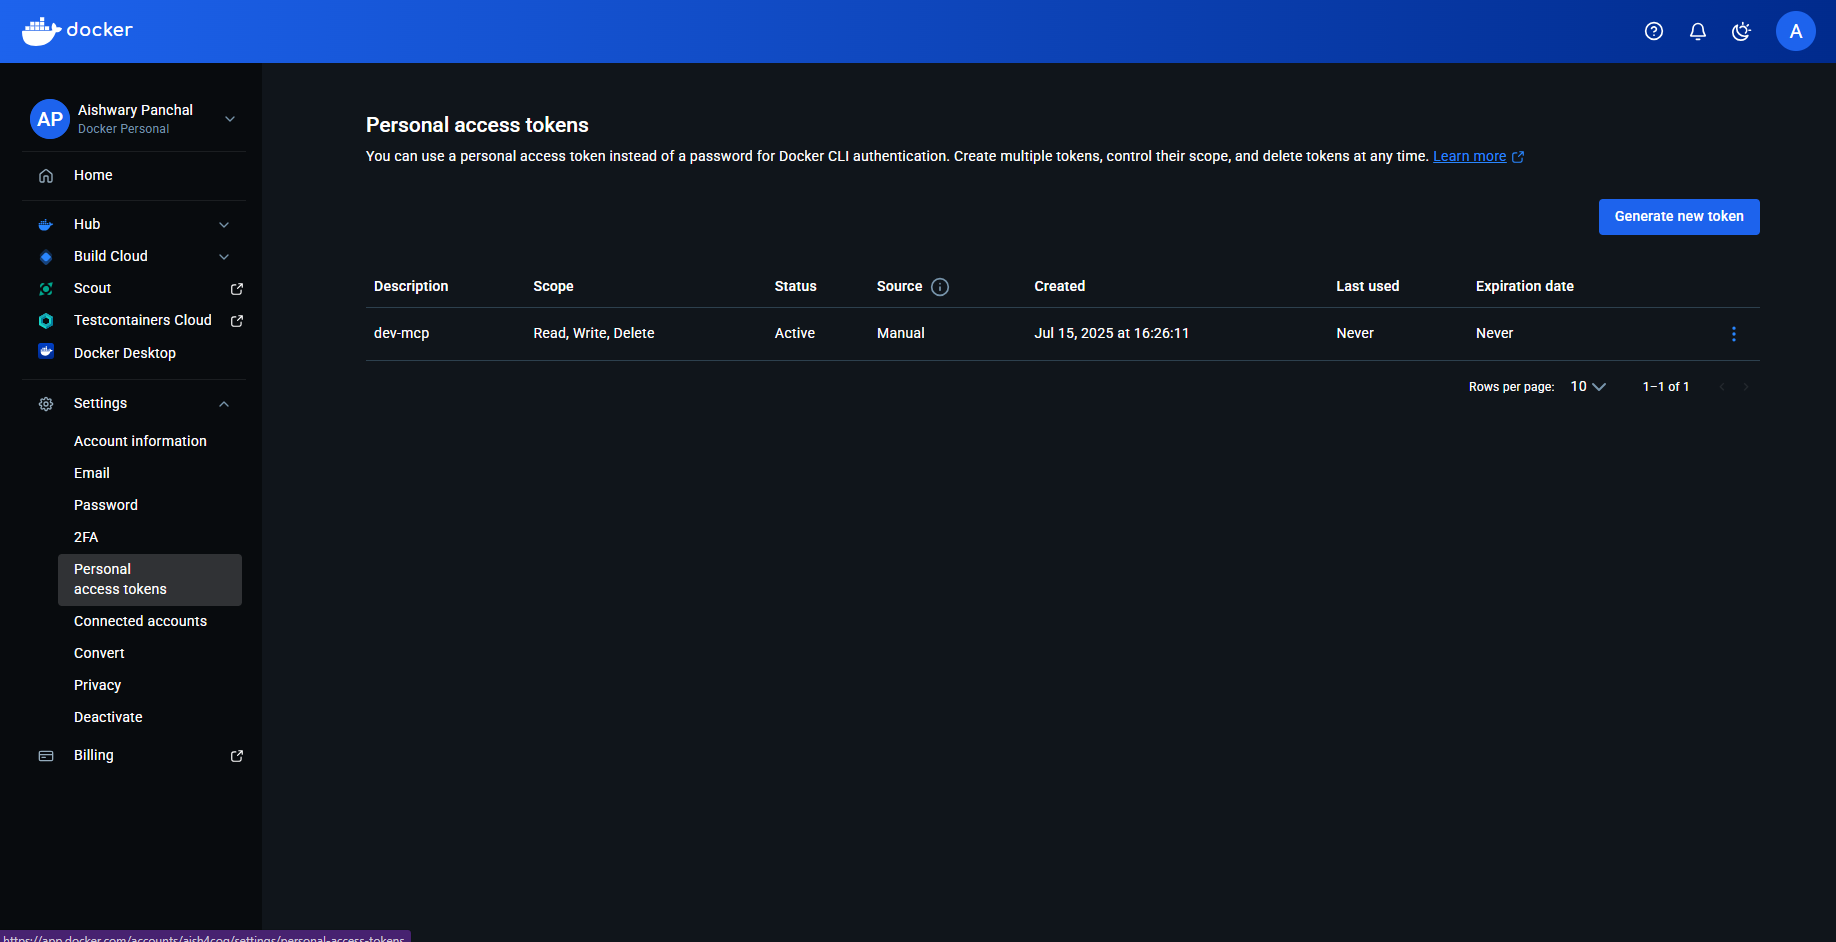
Docker Hub
Credentials required:
- Docker Hub username: This can be obtained from My Hub
- Personal Access Token: Go to Account settings > Personal access tokens and create a token
SonarQube
To get the required credentials:
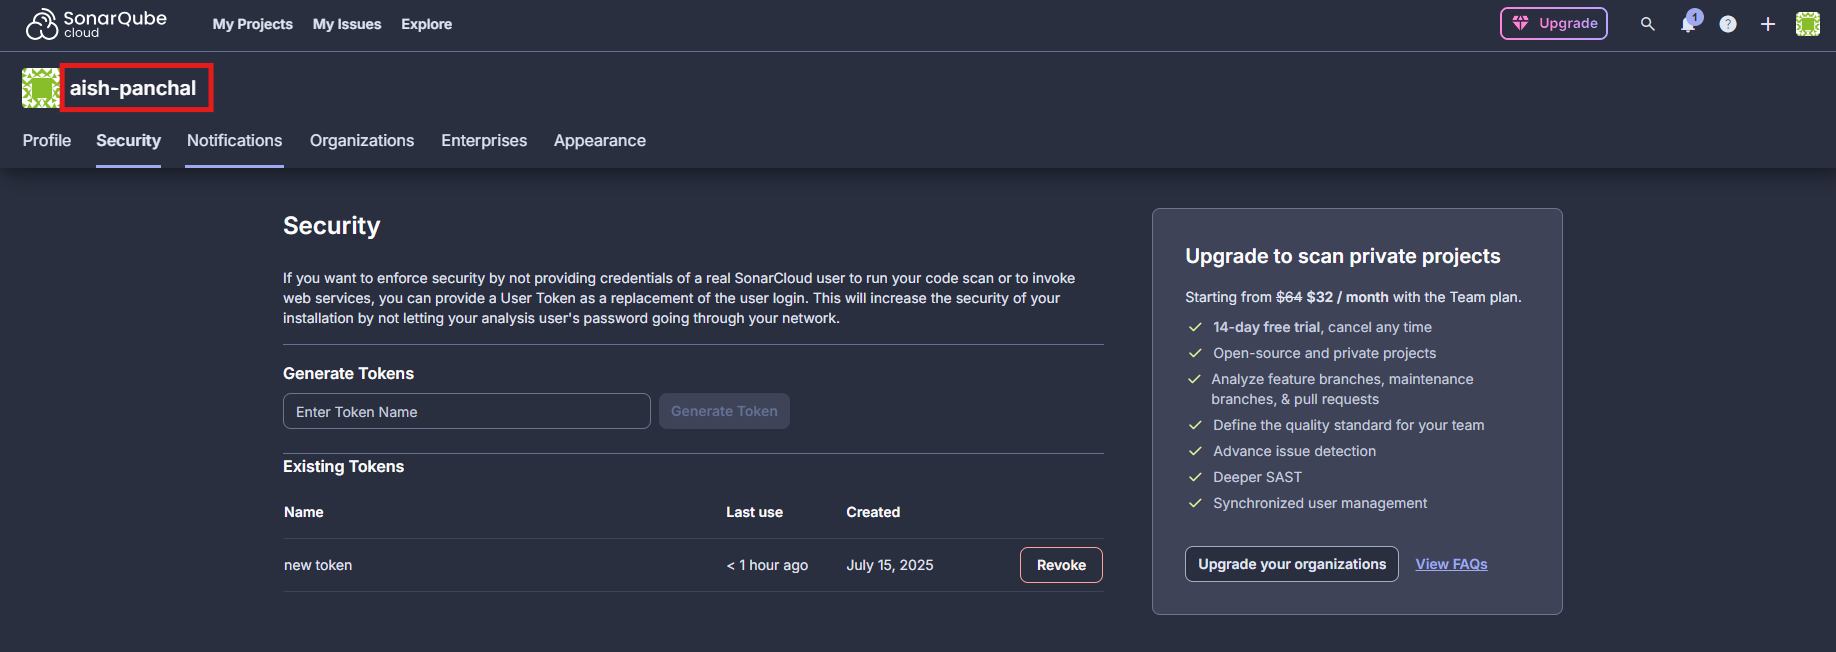
- Sonarqube token: Go to my Account > Security and generate your API token
- Sonarqube org: This is your username, example shown in the below image
- Sonarqube URL:
- For self hosted: format is http://localhost:9000 OR https://sonarqube.mycompany.com
- For SonarCloud: use https://sonarcloud.io
Netlify
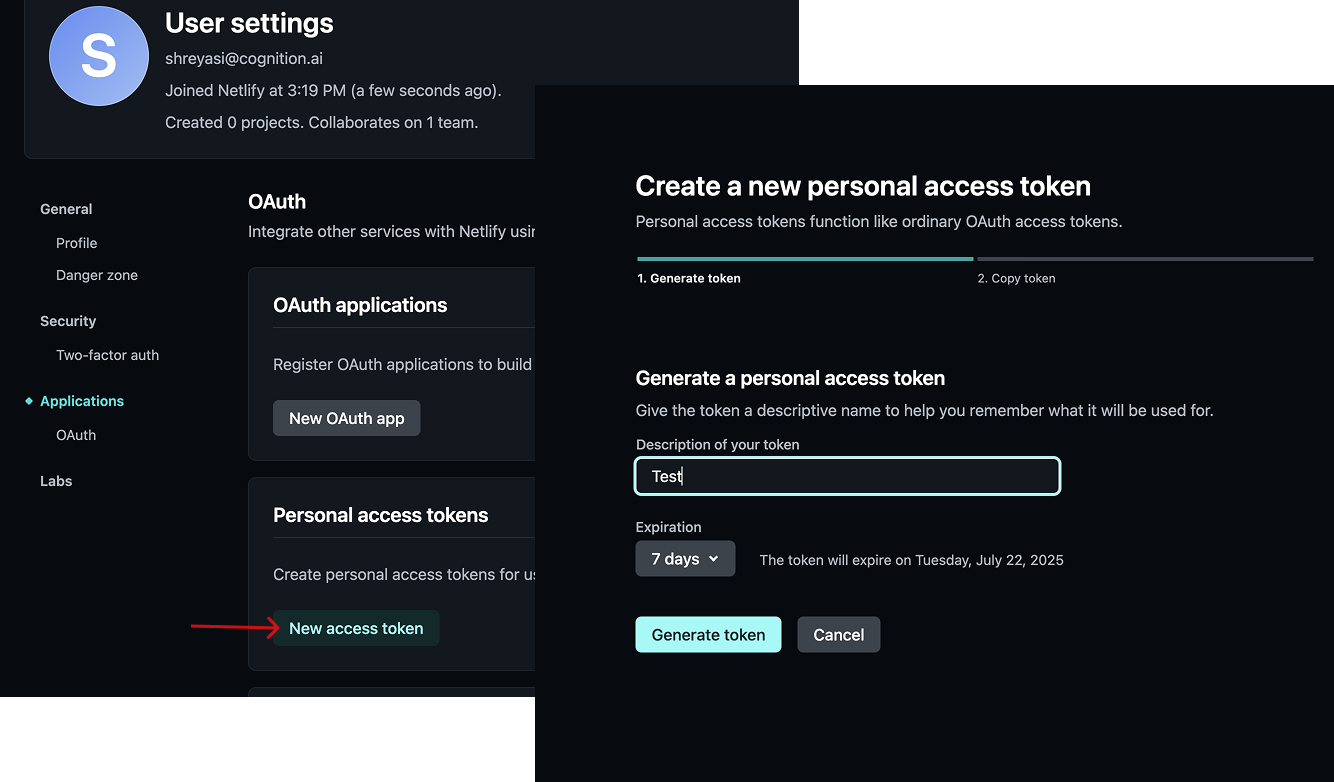
You'll need to provide a Personal Access Token, which you can view and create at https://app.netlify.com/user/applications#personal-access-tokens. Make sure to copy the PAT as soon as it is created. You won't be able to see it again!
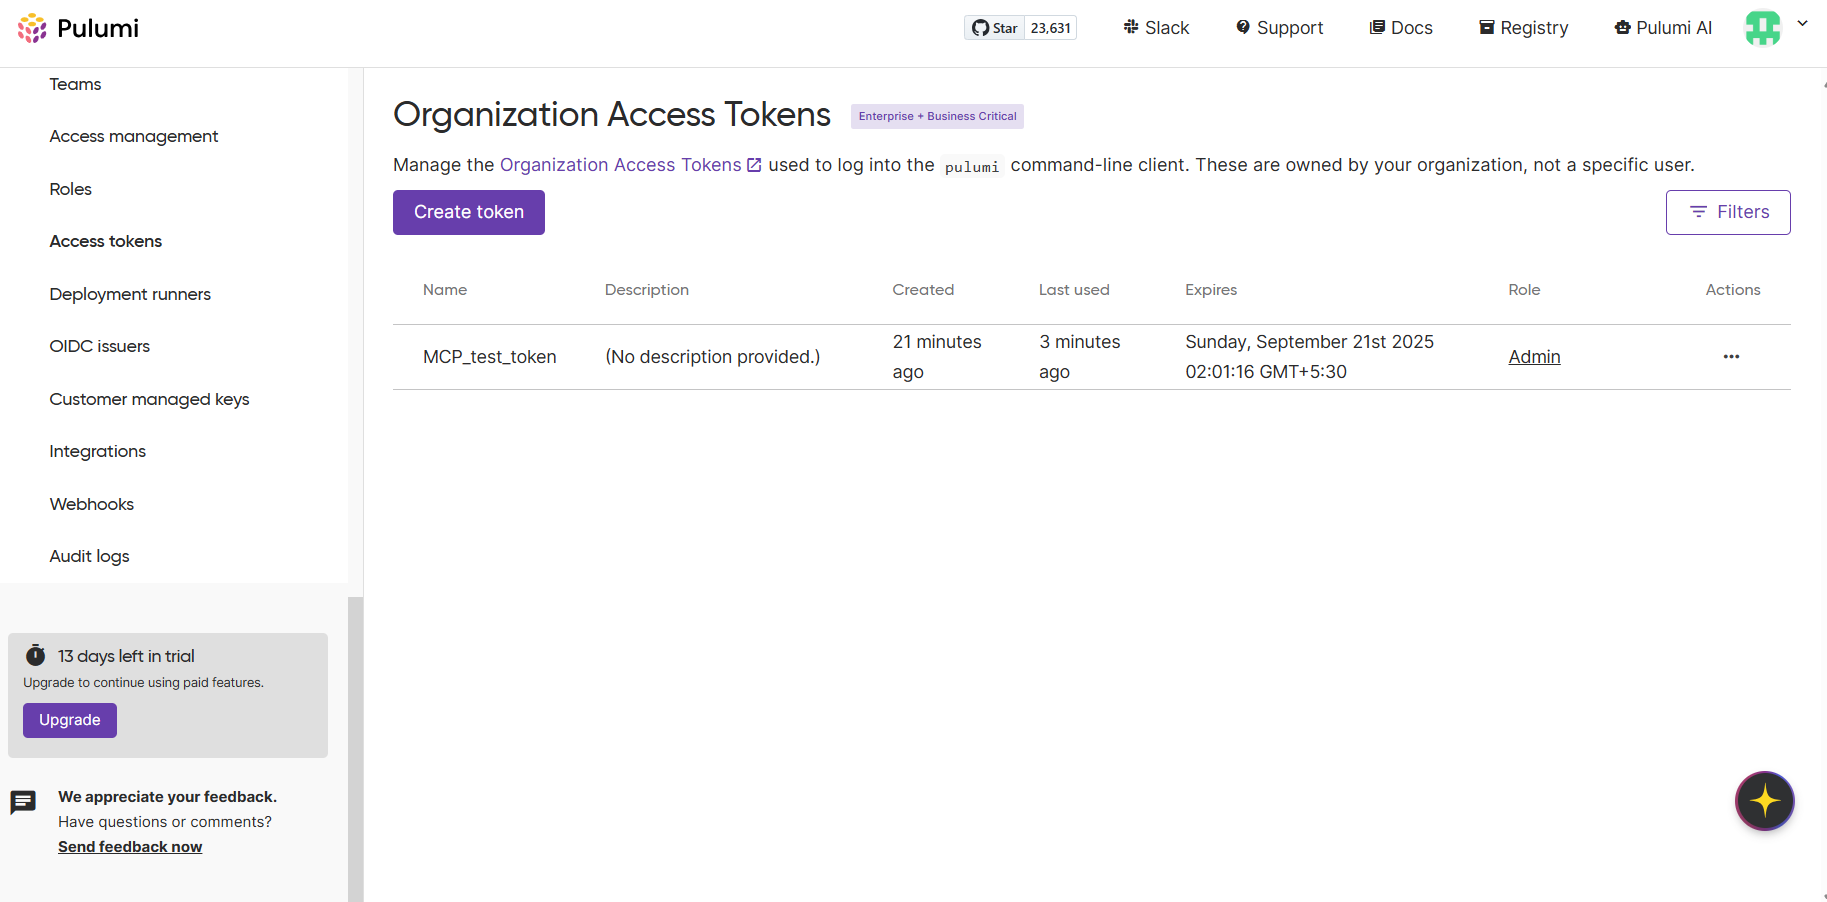
Pulumi
A Pulumi access token can be obtained from the Access tokens section in the sidebar of the Pulumi dashboard.
Parallel
You'll need to provide an API key, which you can generate at https://platform.parallel.ai/
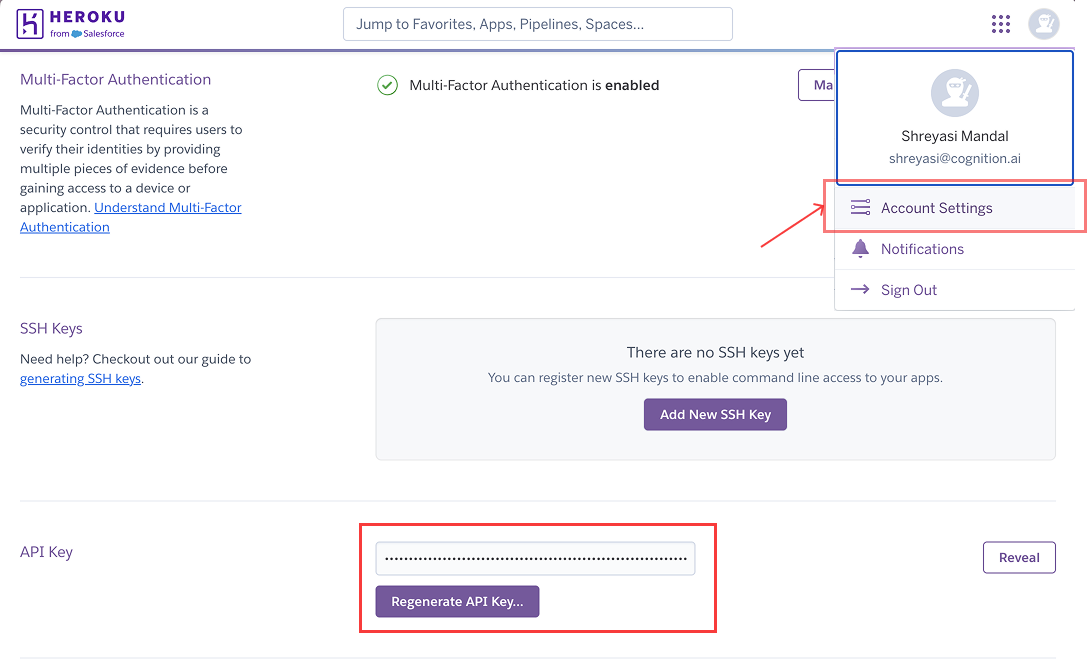
Heroku
You'll need to provide an API Key, which you can find at https://dashboard.heroku.com/account
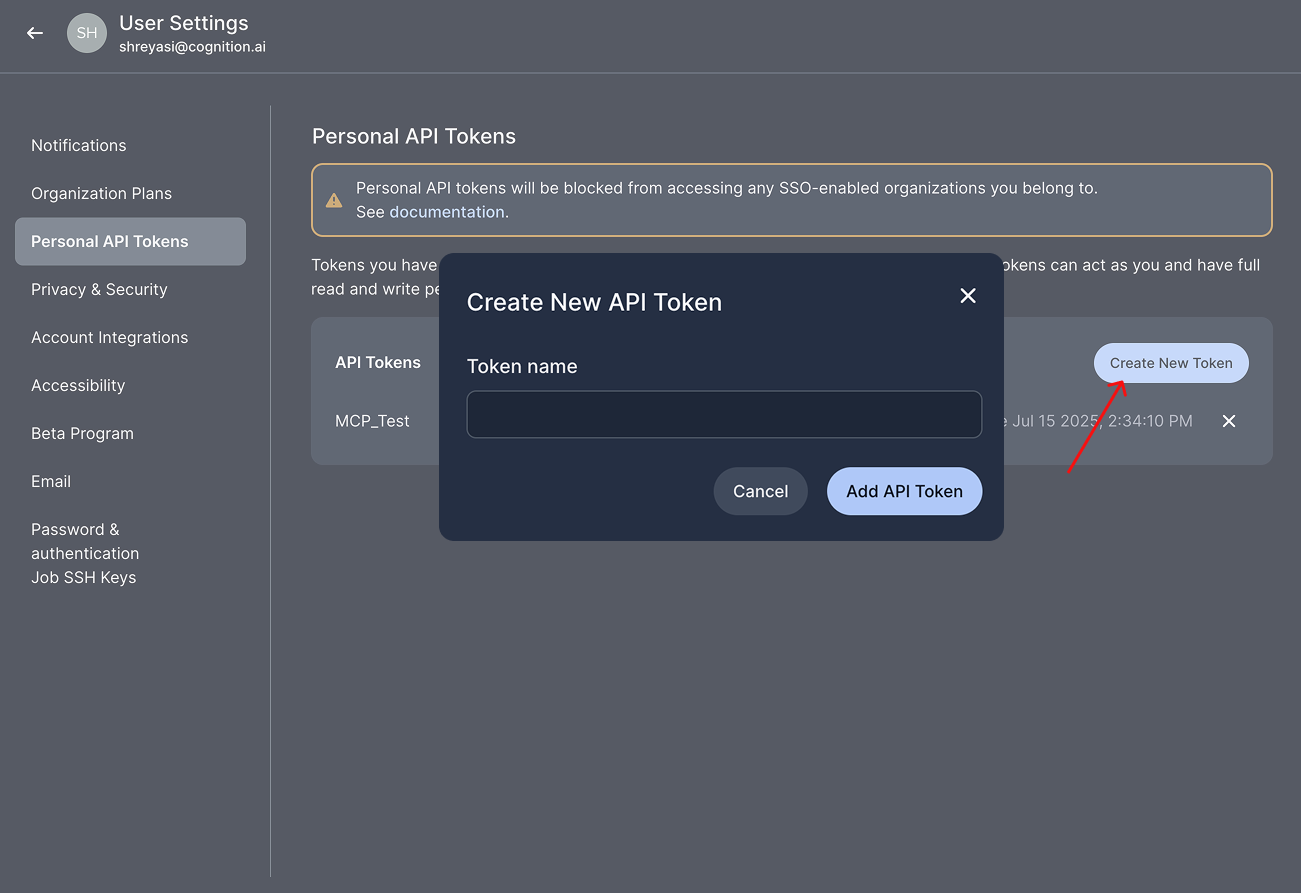
CircleCI
You'll need to provide 2 environment variables:
CIRCLECI_TOKEN- CircleCI API Token, which can be created at https://app.circleci.com/settings/user/tokens. Make sure to copy the API token as soon as it is created. You won't be able to see it again!
CIRCLECI_BASE_URL[Optional] - This is optional and is required for on-prem customers only. The default value is"https://circleci.com"
Cortex
You'll need to provide a Cortex personal access token to enable this connector:
- Log in to your Cortex instance.
- From the left-hand menu, go to Settings → My access tokens.
- Click Create new token.
- Enter a name for the token and description.
- Click Create token and copy the token.
When using this connector, make sure Opulent is configured with the correct Cortex API URL (defaults to https://api.getcortexapp.com).
Square
You'll need to provide an authorization header which follows the format Bearer <TOKEN>, where <TOKEN> is your Square access token. More info at: https://developer.squareup.com/docs/build-basics/access-tokens
Hubspot
You'll need to provide an access token as an environment variable. To get your access token:
- Create a private app in HubSpot:
- Go to Settings > Integrations > Private Apps
- Click "Create private app"
- Name your app and set required scopes
- Click "Create app"
- Copy the generated access token from the "Auth" tab
Redis
Required credentials:
- Redis host
- Redis port
- Redis username
- Redis password
Google Maps
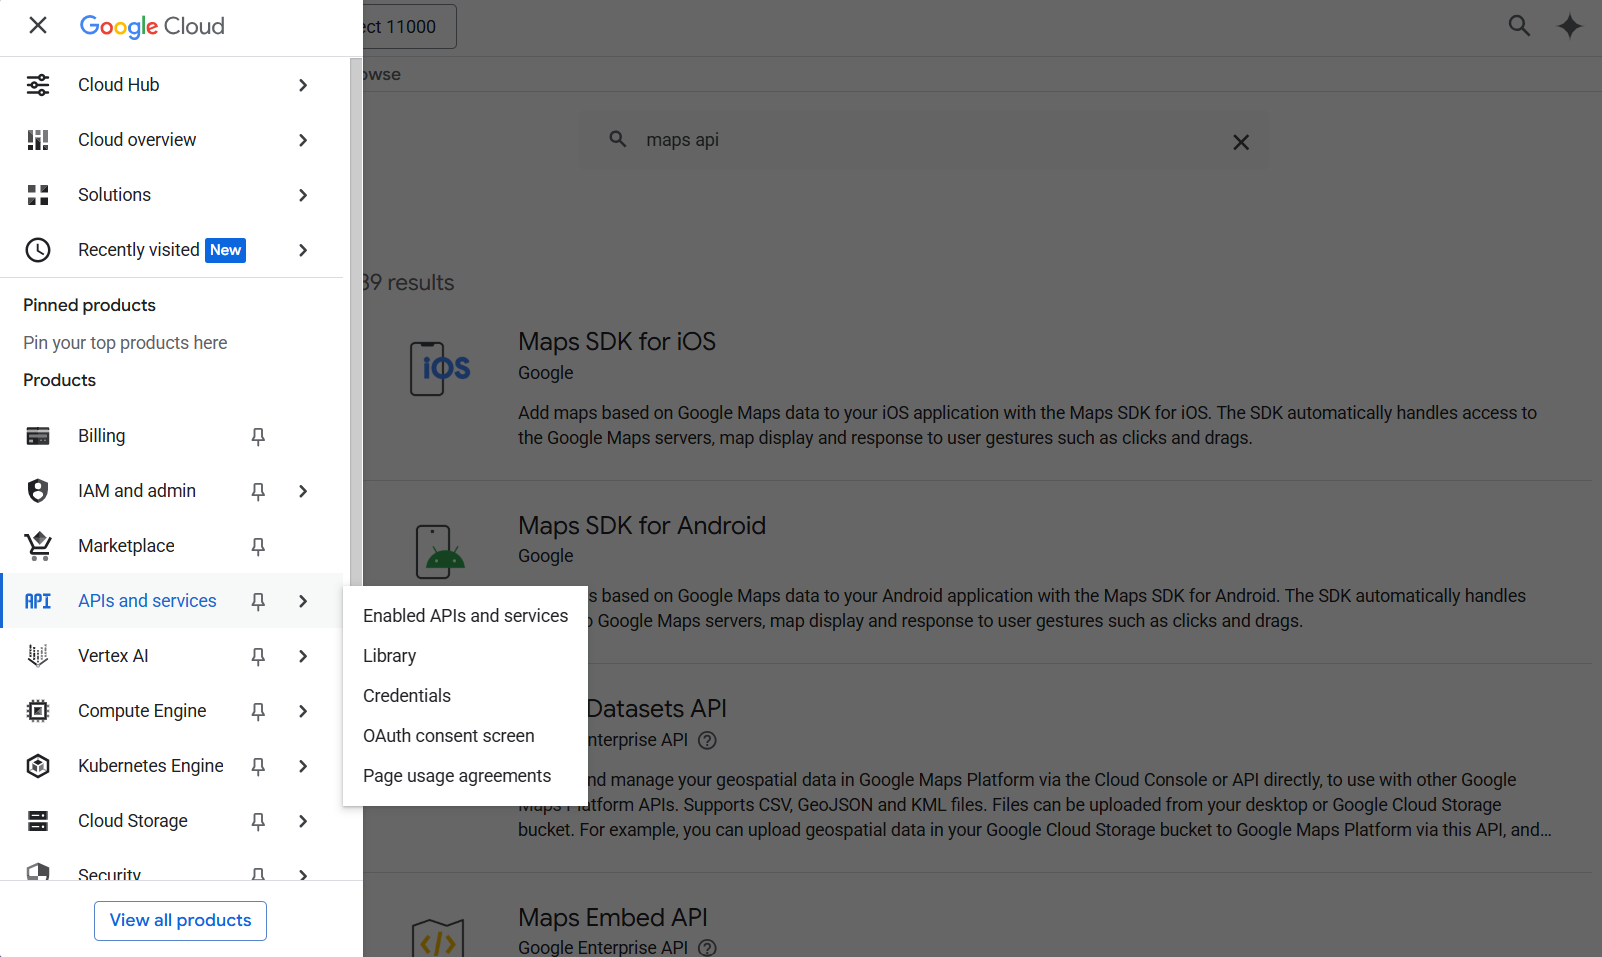
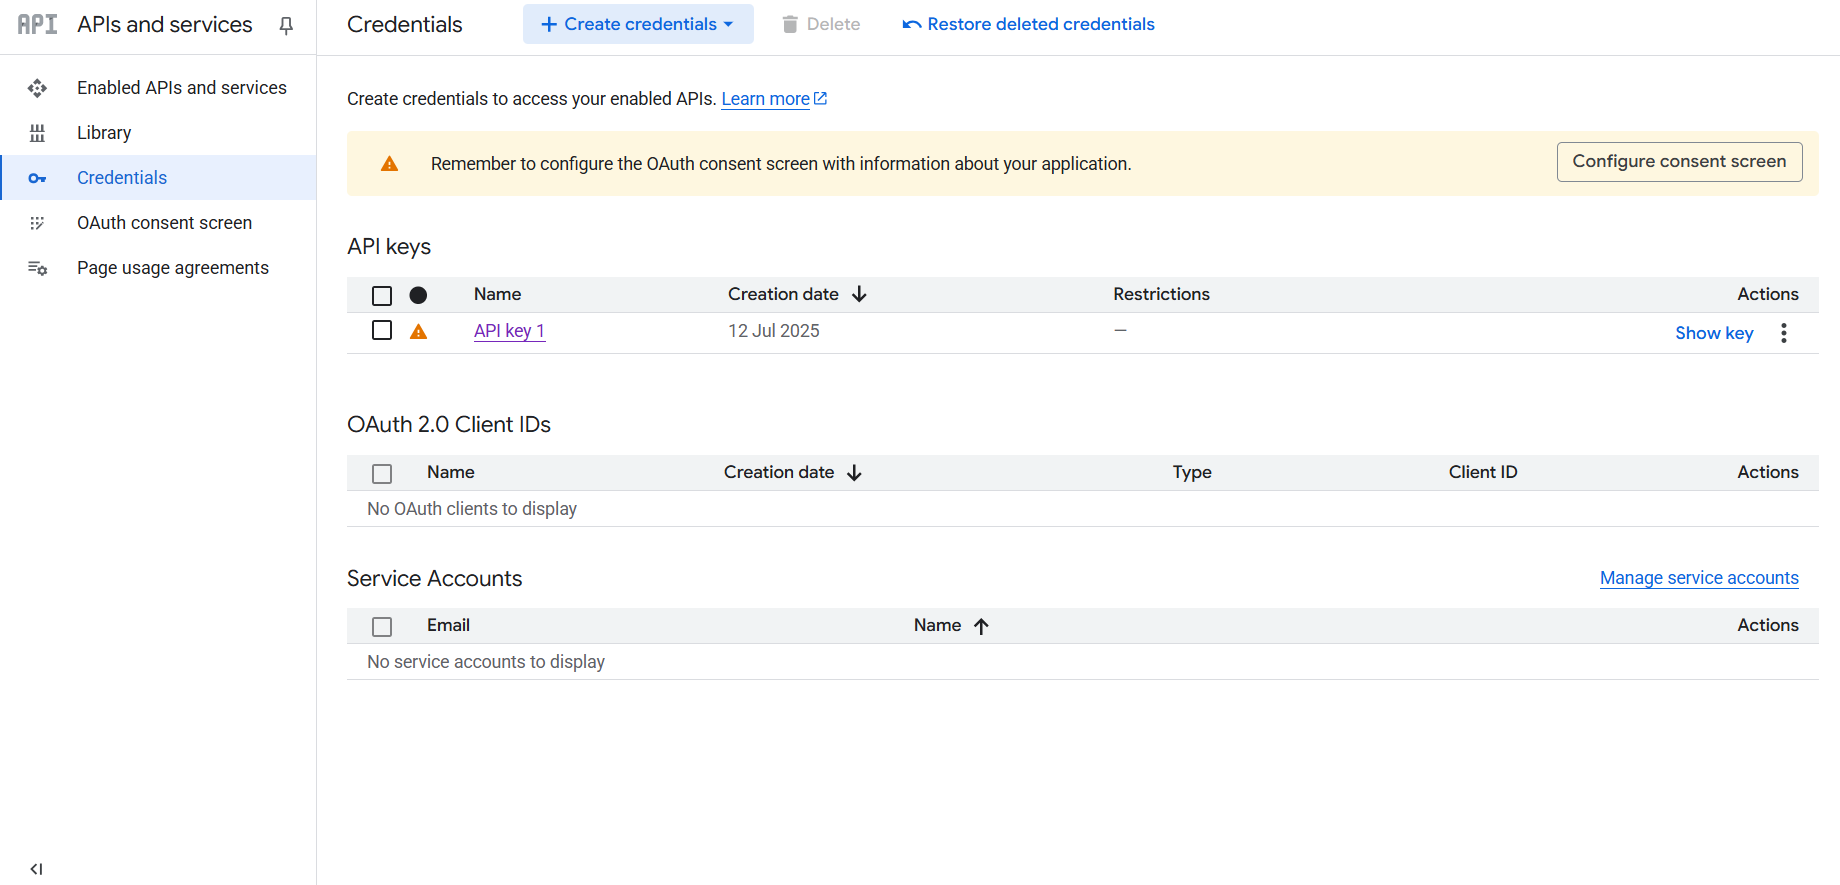
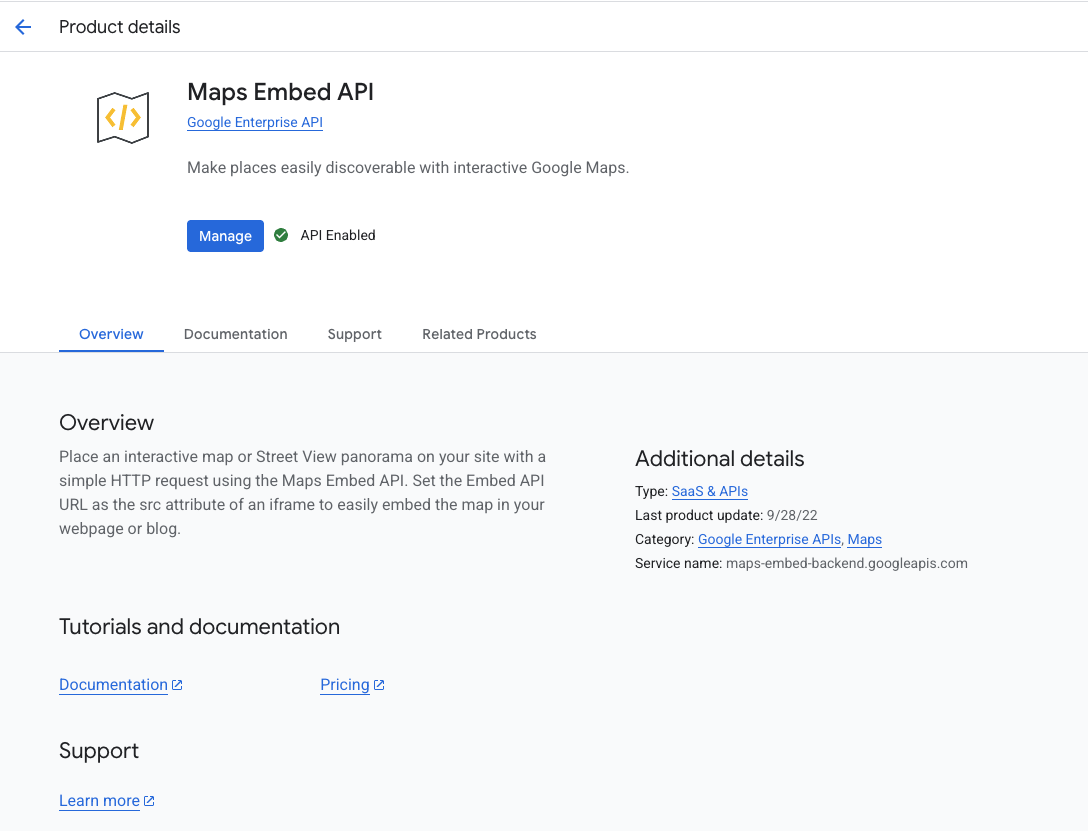
You'll need to (1) provide an API key (2) enable the individual APIs you'd like Opulent to have access to.
To get your API key, navigate to https://console.cloud.google.com/apis/credentials and open the sidebar > APIs and services > Credentials.
To enable an individual API, search for the API and click enable.
Playwright
No environment variables needed for this! Simply enable the integration.
Firecrawl
You'll need to provide an API Key (FIRECRAWL_API_KEY), which you can view and create at https://www.firecrawl.dev/app/api-keys.
ElasticSearch
You'll need to provide 2 environment variables:
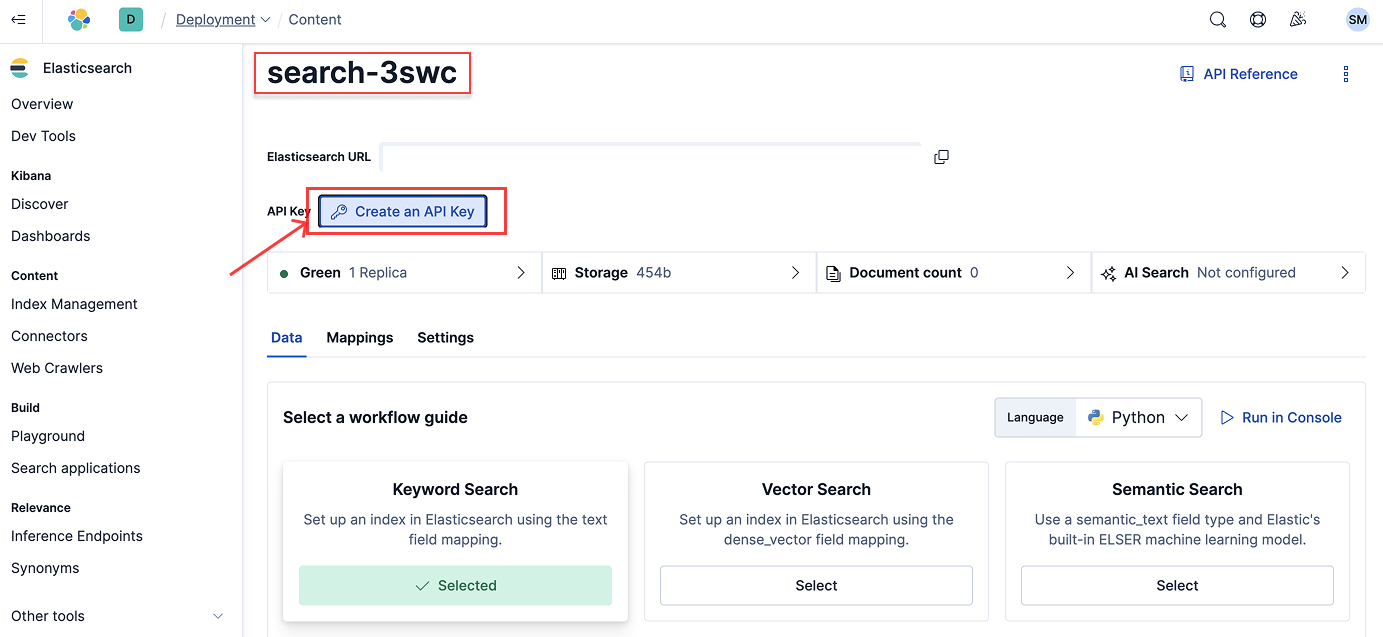
ES_URL- ElasticSearch URL or endpoint, which can be found on the /overview page in Elasticsearch.ES_API_KEY- ElasticSearch API key, which can be created on the/indices/index_details/<name>/datapage in Elasticsearch.
ES_SSL_SKIP_VERIFY is an optional environment variable. When set to true , it skips SSL/TLS certificate verification when connecting to Elasticsearch.
Postgres
The only credential needed is the Postgres connection string.
Plaid
The only credential required is an OAuth bearer access token that can be obtained by running the following code:
curl -X POST https://production.plaid.com/oauth/token \
-H 'Content-Type: application/json' \
-d '{
"client_id": "YOUR_PLAID_CLIENT_ID",
"client_secret": "YOUR_PRODUCTION_SECRET",
"grant_type": "client_credentials",
"scope": "mcp:dashboard"
}'
To obtain the client ID and client production secret, go to https://dashboard.plaid.com/developers/keys
Replicate
The only required credential is the API token which can be found at https://replicate.com/account/api-tokens
Grafana
You'll need to provide 2 environment variables:
- Grafana URL
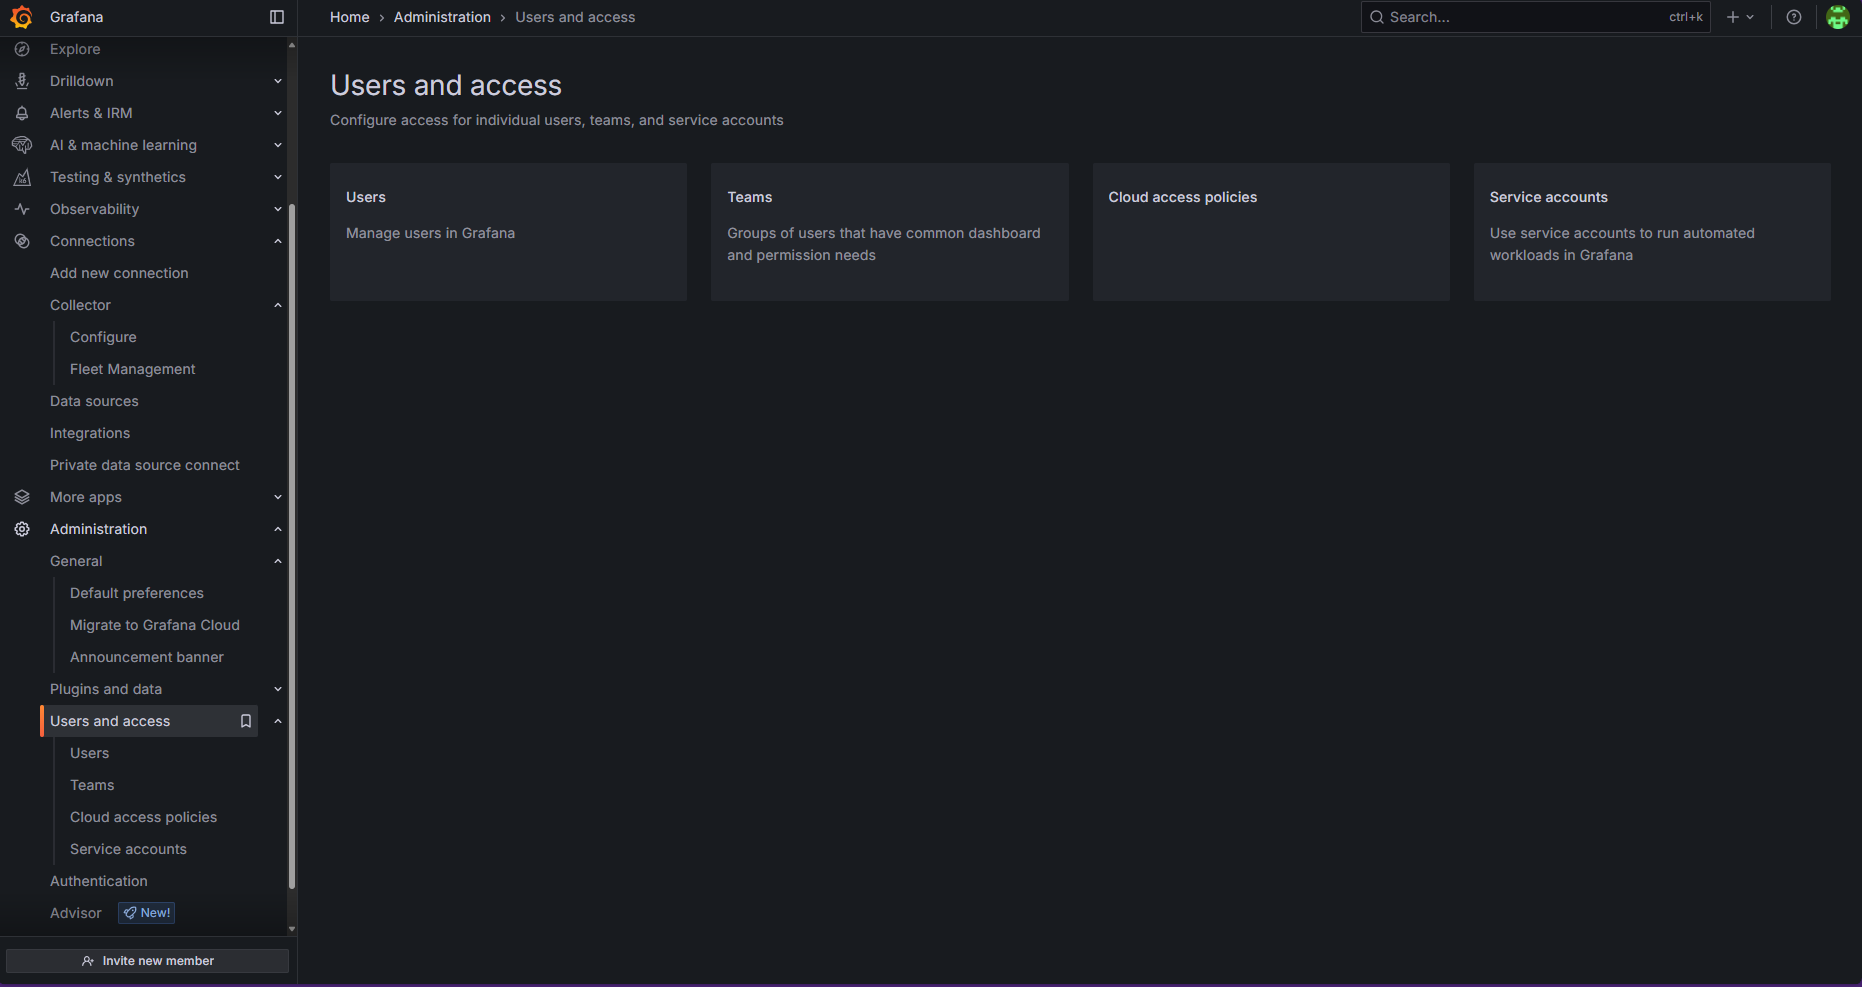
- Grafana service account token: To obtain the token, in the sidebar, go to Administration > Users and access > Service accounts > Add service account (if you don't already have one added) > Add service account token
Pinecone
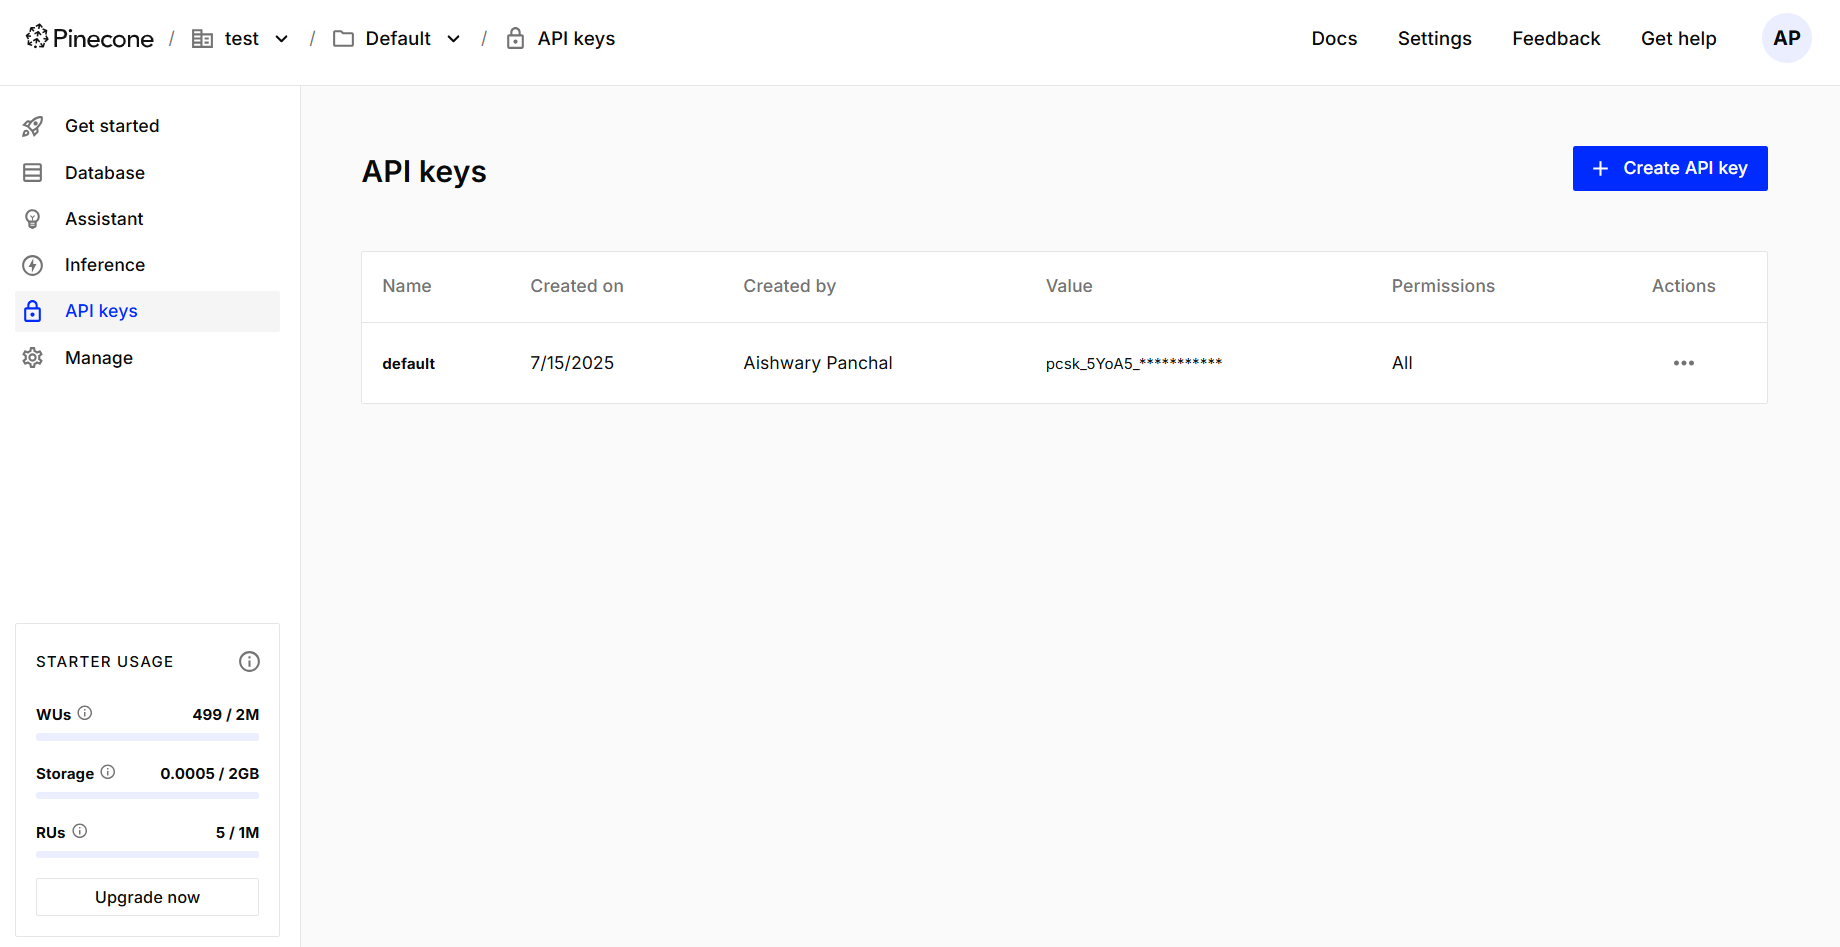
NOTE: The Pinecone MCP supports only indexes with integrated embedding. Indexes for vectors you create with external embedding models are not yet supported as of 7/16/25.
The only credential required is the Pinecone API key, which can be obtained via the API keys page in the Pinecone dashboard as seen below:
Snyk
- First, configure the MCP server. Documentation is available here. Note: Make sure to add a env variable at the bottom (not listed in documentation guide).
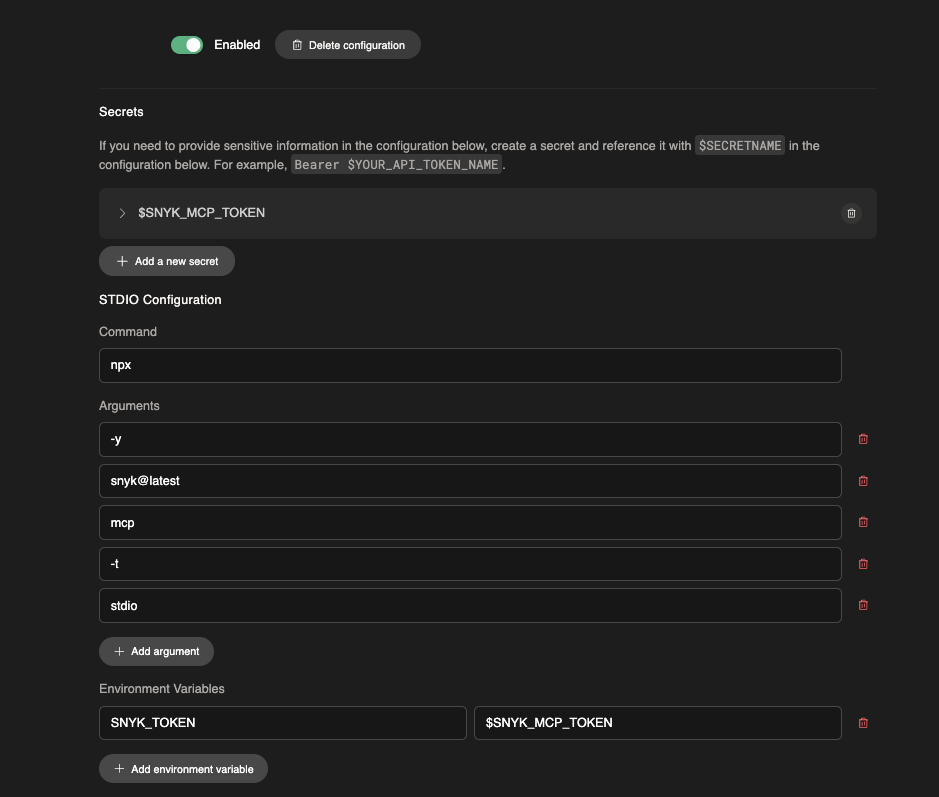
- Install the Snyk CLI on Opulent's machine. Documentation is available here
brew tap snyk/tap
brew install snyk-cli

snyk --disable-trust
Note: some Snyk tests require trust to operate - install on machine after homebrew is installed. Documentation is available here.
Tip: If configured correctly - the full list of Snyk scans should run on the first pass. However, depending on Framework, some scans require an "unmanaged: true" flag (ex: C++) to be passed. Currently you can set this in Knowledge or during your Opulent session. Here's an example:

Tip: We've written an example playbook to help you get started.