Creating Playbooks
Build a library of reusable prompts for your organization
export const PromptBlock = ({children, type, agent, intent, playbookId}) => { var utm = 'utm_source=docs&utm_medium=use-case-gallery&utm_campaign=prompt-block'; var tag = 'docs-use-case-gallery'; var agentParams = (agent ? '&agent=' + agent : '') + (intent ? '&intent=' + intent : '') + (playbookId ? '&playbookId=' + playbookId : ''); var label = type === 'schedule' ? 'Schedule in Opulent' : type === 'playbook' ? 'Create Playbook' : type === 'knowledge' ? 'Add to Knowledge' : agent === 'advanced' ? 'Try in Opulent' : agent === 'dana' ? 'Try in Data Analyst' : agent === 'ada' ? 'Try in Ask Opulent' : 'Try in Opulent'; var buildUrl = function (text) { var encoded = encodeURIComponent(text); if (type === 'schedule') return 'https://platform.opulentia.ai/settings/schedules/create?' + utm + agentParams + '&prompt=' + encoded; if (type === 'playbook') return 'https://platform.opulentia.ai/settings/playbooks/create?' + utm + '&body=' + encoded; if (type === 'knowledge') return 'https://platform.opulentia.ai/knowledge?' + utm + '&body=' + encoded; if (agent === 'ada') return 'https://platform.opulentia.ai/search?' + utm + '&noSubmit=true&prompt=' + encoded; return 'https://platform.opulentia.ai/?tags=' + tag + '&' + utm + agentParams + '&prompt=' + encoded; }; const ref = React.useRef(null); const [href, setHref] = React.useState('#'); React.useEffect(() => { if (!ref.current) return; var codeEl = ref.current.querySelector('pre code'); if (codeEl) { var text = codeEl.textContent.trim(); if (text) setHref(buildUrl(text)); } var header = ref.current.querySelector('[data-component-part="code-block-header"]'); if (header && !header.querySelector('.prompt-block-opulent-link')) { var link = document.createElement('a'); link.href = href; link.target = '_blank'; link.rel = 'noopener noreferrer'; link.className = 'prompt-block-opulent-link'; link.style.cssText = 'display:inline-flex;align-items:center;gap:6px;text-decoration:none;color:#fff;font-size:11px;font-weight:500;padding:4px 10px;border-radius:6px;white-space:nowrap;background:#317CFF;transition:background 0.2s;margin-left:8px;'; link.innerHTML = ' ' + label; link.onmouseenter = function () { link.style.background = '#2968D9'; }; link.onmouseleave = function () { link.style.background = '#317CFF'; }; header.appendChild(link); } var existingLink = ref.current.querySelector('.prompt-block-opulent-link'); if (existingLink && href !== '#') existingLink.href = href; }); return
What are Playbooks?
Playbooks are easily shareable, reusable prompts for repeated tasks
A playbook is like a custom system prompt for a repeated task. For example, if you need many different Opulent sessions that each integrate the same third-party library, but in different parts of your application, you might want a Playbook.
Playbooks are also easily shareable and reusable, so once anyone succeeds with Opulent, others can more easily replicate that success.
Playbooks are Documented. A playbook is a reusable prompt recipe — a pattern you attach to a session. It is a distinct primitive from a Runbook, which is a durable, step-by-step operating procedure promoted from the workspace context engine (runbook_manage). A runbook describes when and why to operate in a lane; a Skill describes the exact step-by-step how; a playbook is the prompt you reuse across sessions. Do not merge these — pick the primitive that matches the job.
Most best practices, style guides, or other project-specific instructions should be shared with Opulent using Knowledge. We recommend reading the docs on Knowledge before creating Playbooks, to understand which method better fits your needs.
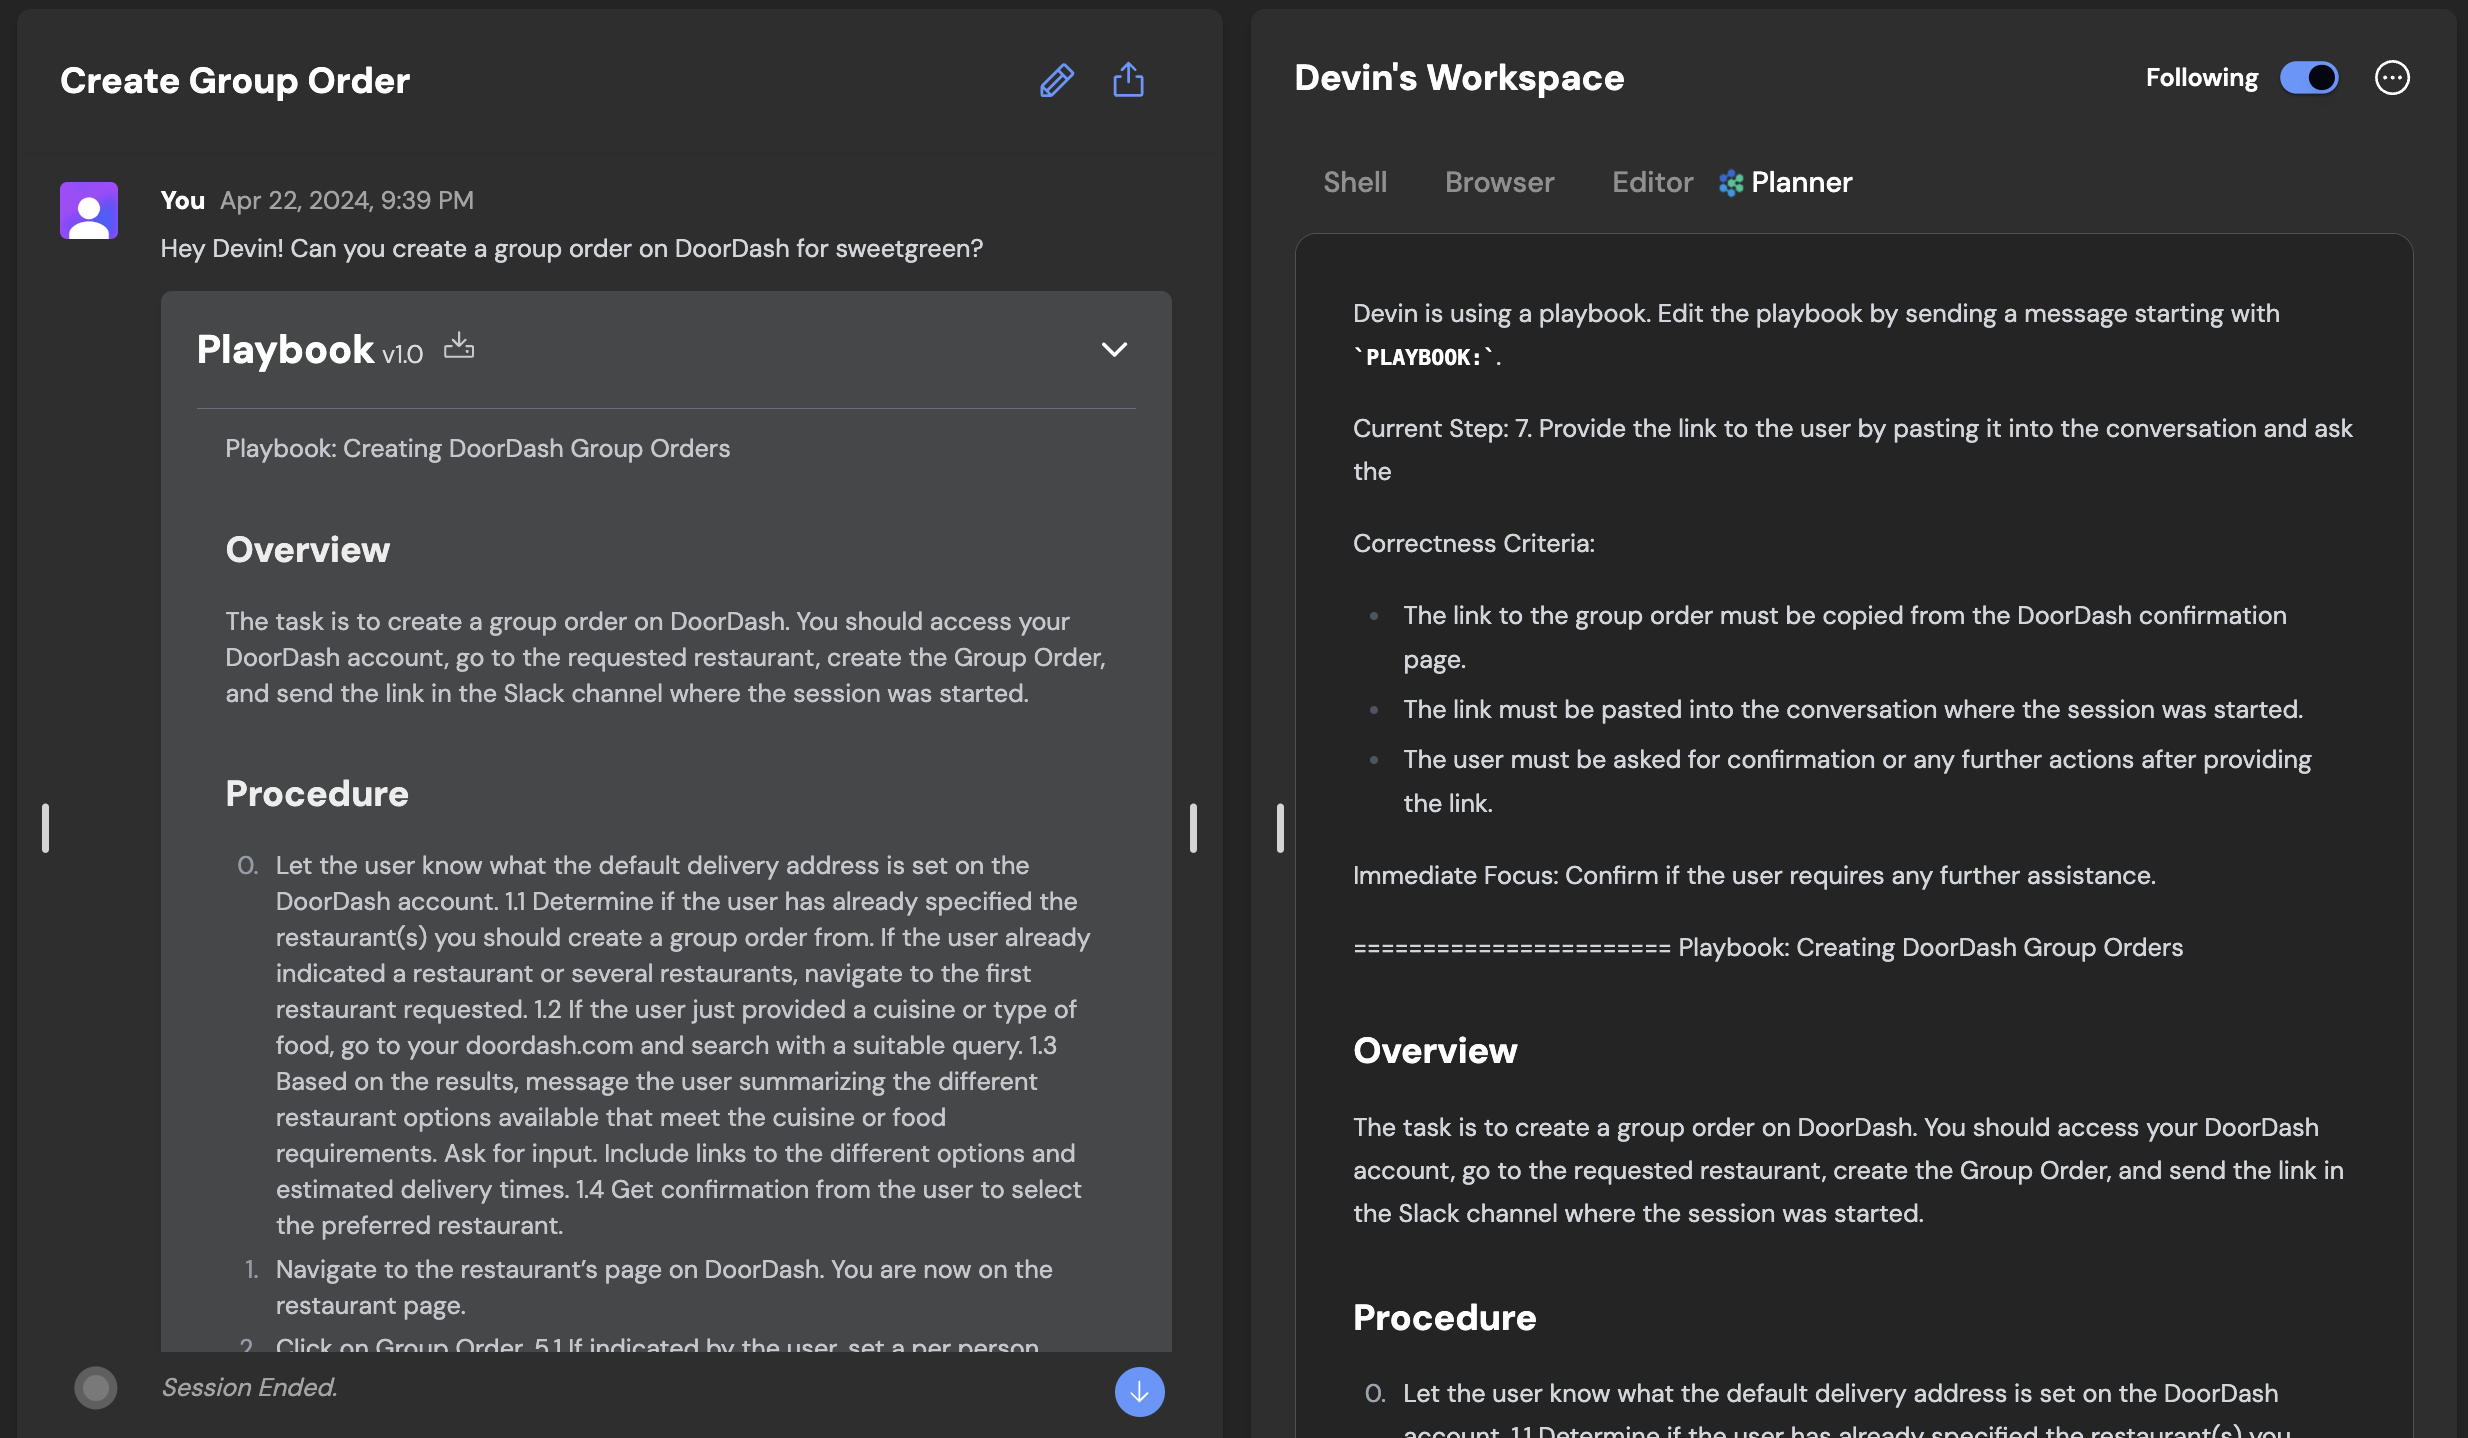
We recommend using Playbooks when:
- You or your teammates will reuse the prompt across multiple sessions.
- You find yourself repeating the same reminders to Opulent.
- The use case may be relevant to others — in your organization or within the Opulent user community.
Getting Started with Playbooks
Playbooks can immediately unlock Opulent's ability to contribute across a wide range of areas, but today they require skill to write. Similar to prompt engineering, writing playbooks takes trial and error. The fruit of this labor, though, is a document that unlocks Opulent's ability to independently tackle complex work — from ingesting data into Redshift and performing database migrations to using diverse software and APIs: e.g. Together, Plaid, Stripe, Modal, Springboot, Odoo, and Storybook.
Consider writing your first playbook with a simple multi-step task you want Opulent to tackle.
- Create a document that outlines...
- The outcome you want Opulent to achieve
- The steps required to get there
- Optional: Add sections like Procedure, Specifications, Advice, Forbidden Actions or Required from User
- Procedure: Outline the entire scope of the task. Include at least one step for setup, the actual task, and delivery.
- Specifications: Describe postconditions — what should be true after Opulent is done?
- Advice: Include tips to correct Opulent's priors
- Forbidden Actions: Include any action Opulent should absolutely not take
- Required from User: Describe any input or information required from the user
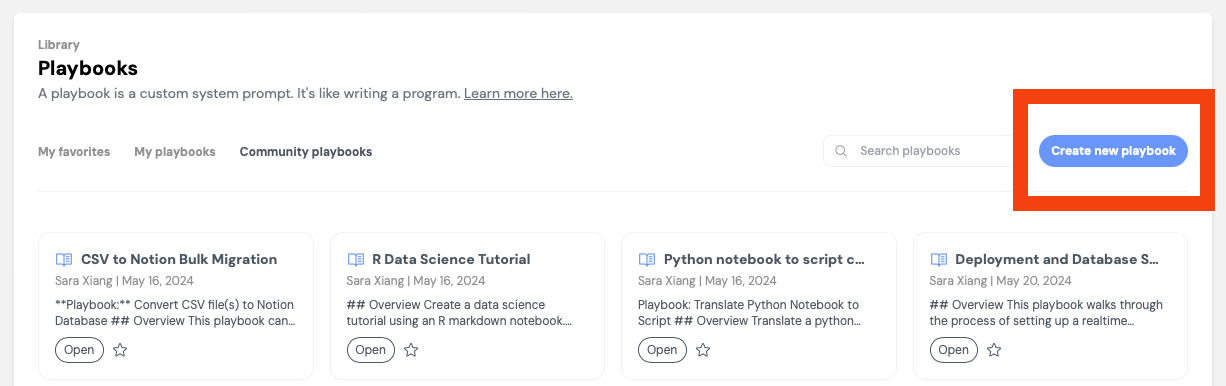
- Create the playbook directly in the web app by clicking Create a new Playbook. Alternatively, save a file with the file extension
.opulent.mdand drag-and-drop it into the web app when starting an Opulent session
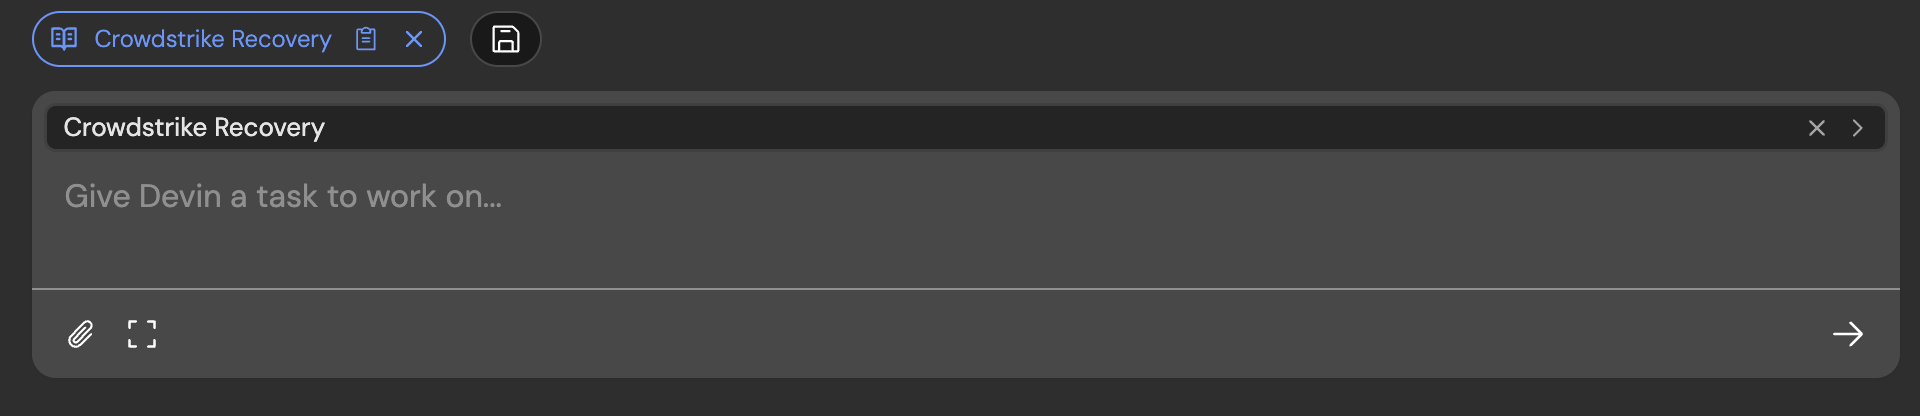
You've successfully attached a playbook to a session if you see a blue pill appear, along with an inline component for editing the playbook before starting your session.
Writing a Great Playbook
Procedure
The Procedure section should...
- Have one step per line, each line written imperatively
- Cover the entire scope of the task
- Include at least one step for setup, the actual task, and delivery
- Aim to make the steps Mutually Exclusive and Collectively Exhaustive
- Additional Tips
- Procedures help you define the order of Opulent's actions — like if/else/loops/goto in code
- Don't make tasks too specific unless you really need to; this can reduce Opulent's ability to problem-solve
- Each procedure step should contain an action verb — e.g. Write, Navigate to, etc.
Advice and Pointers
Share advice and pointers with Opulent if...
- You have a preferred way of completing the task
- The advice applies to the entire task, or to multiple steps. Advice specific to one step should be written next to that step (e.g. as a sub-bullet)
- You are correcting Opulent's priors. Advice can function like comments on pseudocode that influence its execution.
If the advice only applies to one Procedure step, write the advice under the procedure step using nested bullet points.
Specifications
The Specifications section can help describe the postconditions of the playbook — what should be true once Opulent is done?
What's Needed From User
Think through anything necessary but outside of Opulent's control. For example, if the user needs to provide a token or information that is not publicly available to Opulent.
Other Tips + Tactics
Iterate and improve through trial and error
- Run 2+ Opulent sessions in parallel with the same playbook to quickly identify possible errors.
- If Opulent needs help, chat with it to help it along. Then add to your playbook so Opulent succeeds without intervention next time.
Tell Opulent what good looks like
Be explicit about what the deliverable is & how Opulent should communicate that it's done (e.g. what files to attach or links to share, if any).
Optimize how quickly your playbook runs
Explore the different decisions Opulent can make, and guide it down the most efficient path in the playbook.
Specific commands, incantations and strings are fair game
They can be the difference maker between a working playbook and a broken one.
- For example, the following can be a very good detail to include because alloy and tts-1 are probably not things Opulent would've picked otherwise, and this guides Opulent in a direction that is more likely to succeed!
3. Create request dict with model: "tts-1", voice: "alloy"
Example Playbook
View example sessions using the playbook below here and here.
Macros
You can assign a macro to any playbook — a short identifier starting with ! (e.g., !data-tutorial). Macros let you quickly attach a playbook to a session by typing its macro name in the prompt input. Macros can only contain letters, numbers, and hyphens, and must be unique within your organization.
Version History
Playbooks maintain a version history so you can track changes over time. Each time you edit and save a playbook, a new version is created. You can view previous versions and revert to an earlier version if a recent change didn't work out as expected.
Enterprise Playbooks
For enterprise customers, playbooks can be managed at the enterprise level in addition to the organization level. Enterprise playbooks are shared across all organizations in your enterprise, making it easy to standardize workflows across teams. Enterprise admins can create and manage enterprise-level playbooks from the enterprise settings.
Playbook: R Data Science Tutorial
Overview
Create a data science tutorial using an R markdown notebook.
What's Needed From User
- Link to a dataset (csv file attachment or kaggle link)
- Specific task to create a data science tutorial for
Procedure
- Download the dataset provided by the user.
- If needed, download the dataset using the Kaggle CLI - you don't need any credentials for this
- Create an R markdown notebook titled
data_science_tutorial.Rmd.
- Create a
tmp.Rmd file for writing and saving intermediate code.
- Create 5 main sections inside the
data_science_tutorial.Rmd file and add code from the tmp.Rmd file containing the following:
- Dataset Statistics. Generate a statistical summary of the dataset.
- EDA (Exploratory Data Analysis). Create a bar chart and a scatter plot for the provided data.
- Train-test split. Split the data in an 80:20 ratio. Save the training and testing data.
- Training the machine learning model. Save the model once trained.
- Inference with the saved model. Load the saved model and evaluate its performance on the test set using the metric specified by the user.
- Once the code is written, add a short explanation for each section.
- Convert the R markdown notebook to HTML format
- Send the final R markdown notebook, HTML file, saved model and testing data to the user.
Specifications
- Send the R markdown notebook and HTML file to the user.
- Send the saved model and testing data to the user.
Advice and Pointers
- Do not re-install packages if already installed.
- Sign in to RStudio is not required to complete this task.
- Run the entire notebook after you add code for each section.
Forbidden Actions
- Do not overwrite the
data_science_tutorial.Rmd file.